Create your first Internet of Things application in under 30 minutes with IBM Bluemix
Yes, I am not kidding, and you’ll see how it’s done as you follow through the steps in this article. Even non-technical folks can try out.
To get a quick understanding of Bluemix, you may refer to my other article ‘Bluemix for Dummies’.
Before going to the creation of the application, let me give you a quick definition of Internet of Things (IoT). IoT is a network of sensors where data is exchanged, using different connectivity protocols, with systems. This set up can be leveraged to create a new business application or to enhance an existing process. The exchange of the data can be bi-directional between sensors and systems.
Examples of sensors can be temperature sensors, motion sensors, flow meters, heart meter monitors, biometric devices, smoke detectors, & etc.
Examples of connectivity can be wifi, radio, GPRS, GSM, LAN, WAN, & etc. Examples of systems can be a remote health monitoring applications, SCADA applications, etc
Let me give some examples of IoT in action that you can relate to:
- A doctor in Delhi would like to monitor the heart rate and ECG of a patient in Mumbai. This is done with the patient having sensors attached to him that collect the ECG data and the heart rate and send to a central system. The system then sends this data to the doctor either through a mobile push notification or a live feed to his laptop browser.
- It’s a hot summer and you want to switch on the AC of your room through your mobile while you’re on the way to office. In this case, the mobile will send the data to a central system, which, in turn, will send the command to the AC to switch on.
- There’s a fire in a commercial building, and all the doors of the building are unlocked automatically with a notification sent to the fire brigade and building authorities. How is this done? Fire alarm sensors send the data to a central system in the event of a fire. The central system will open all doors by interfacing with the access control system (which opens doors when a user authenticates his identity using RFID tags or biometric devices), and then send a notification to the fire brigade and building authorities.
- Your kid has got on the school bus, and you’d like to know the real time location of that schoool bus on your mobile . This is possible by fitting the buses with GPS devices, which will send data at periodic intervals to a central system. The system will superimpose the data coming on a GIS map (like Google Maps) that can be accessed by your phone through the Internet.
Now, let’s come back to the purpose of this article, which is to create a simple IoT application.
In this scenario, you’d use a temperature sensor that’ll send data to a central system. The central system evaluates the temperature reading and depending on the reading, it would throw an appropriate message. The central system, in this case, would be the IoT application running in Bluemix.
Below is the schematic representation of the same..
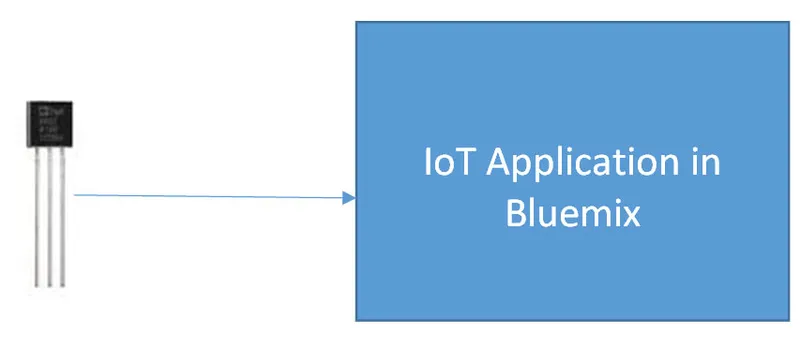
We’d use a simulator of a temperature sensor. this way, we needn’t require an actual hardware device to test our application.
Let’s get started with the creation of an IoT application in Bluemix.
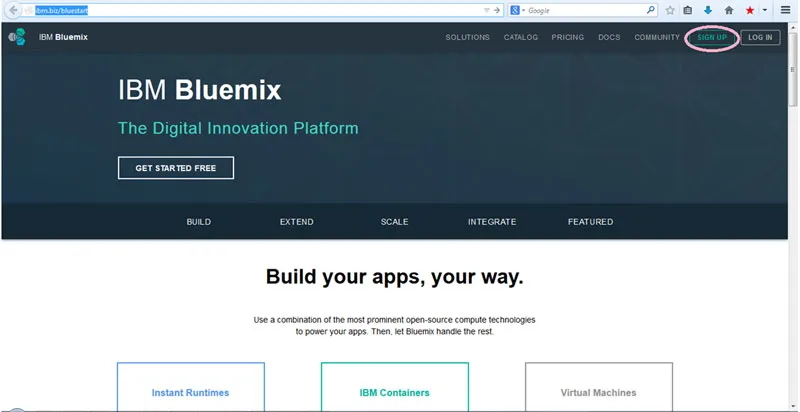
You can go to the Bluemix site and sign up if you don’t have an account. It also has a 30 day free trial, after which you can continue using it through a ‘freemium model.’
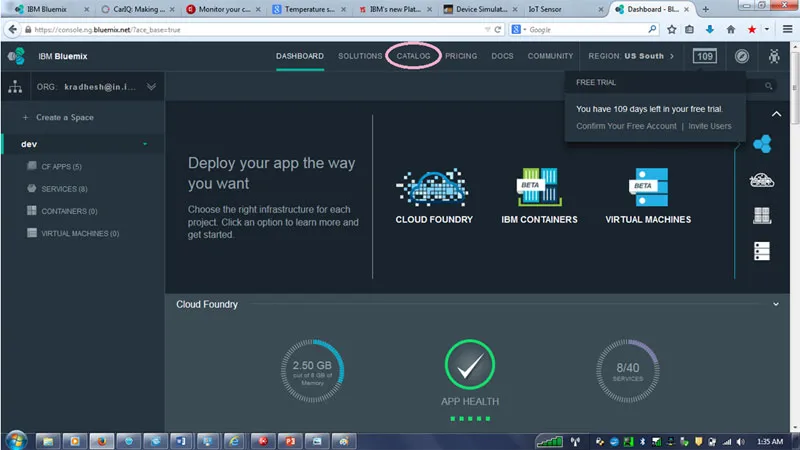
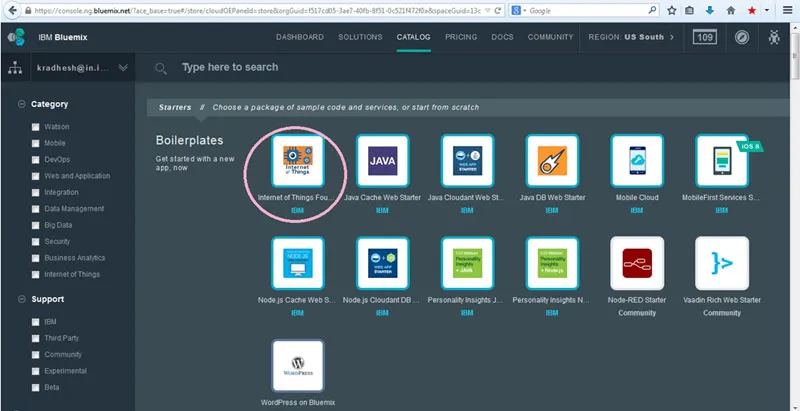
After logging in, you’ll come to the screen below. Click on the highlighted ‘Catalog’ button.
On coming to the Catalog page, click on the ‘Internet of Things Application Foundation Starter’. This is the system that’ll collect data from the sensor .
On clicking “Internet of Things Foundation Starter” you will be going to the screen below, where you put in the name of your application. Remember, this name has to be unique in the Bluemix domain, so I may suggest you put the first three characters of your first name, last name and city. In my case, I put ‘RadKanMum’
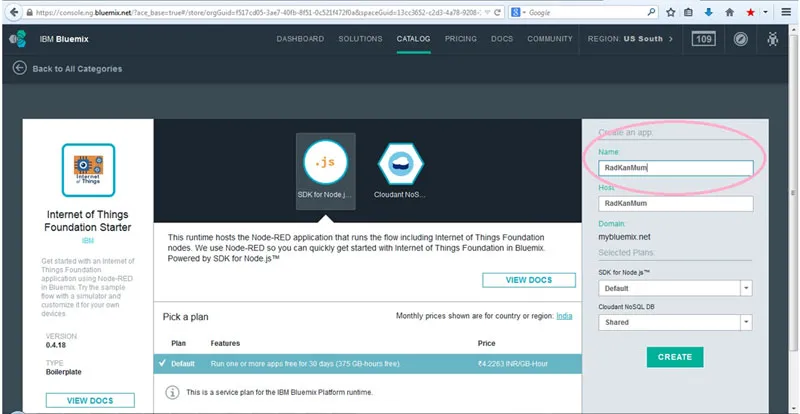
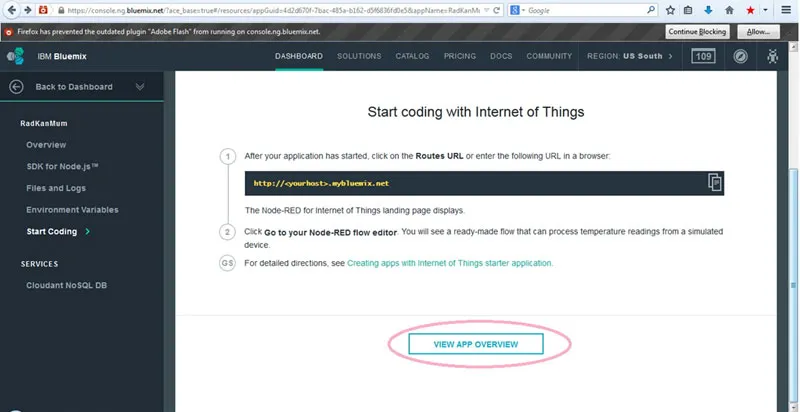
Click the ‘Create’ button, after which you’ll be taken to the screen below. Click on 'View Application Overview. (Please note: If you get a ‘host taken’ error when you hit the “Create” button, try changing the name of your application.)
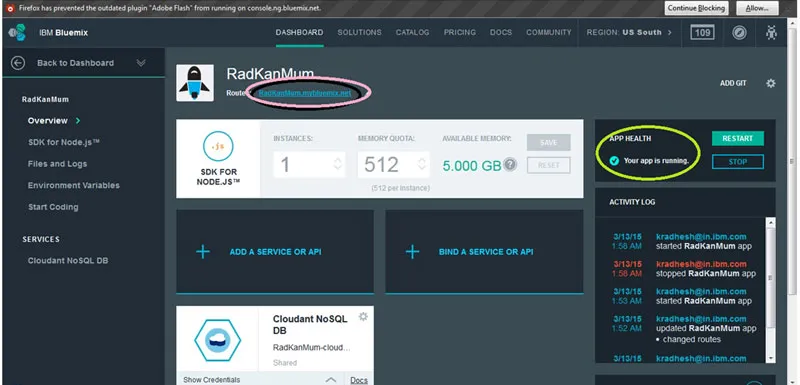
Next, you come to the screen of the ‘Application.’ This screen gives the status of the application, how many instances are active, what is the memory it is using and what back-end it is connected to. In this case, it’s a Cloudant NoSQL database.
Ensure that the ‘Application Health’ (circled in green) shows ‘Your app is running,’ and if the app is running you can click on the URL (circled in pink).
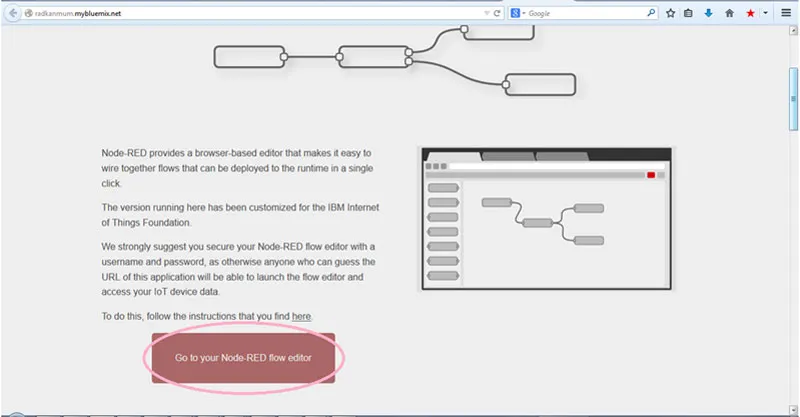
After that, you’ll come to the page below. Click on ‘Go to your Node ReD flow editor.’
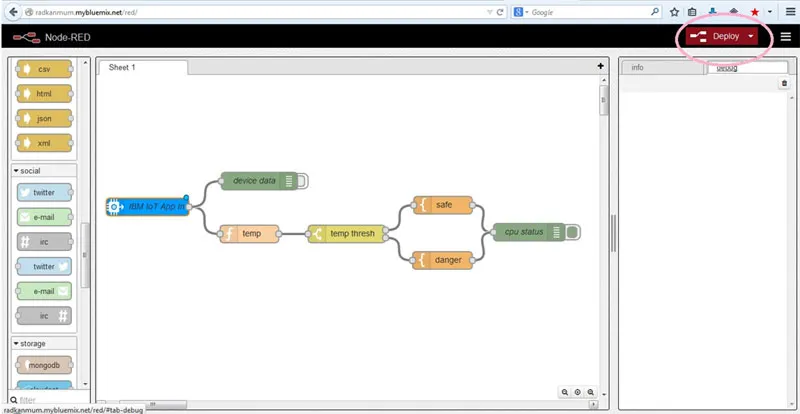
This leads you to the IoT application editor page. As you see, there’s a sample IoT application already created for you by Bluemix.
We’ll now quickly run through the different nodes of IoT application and panes of the screen shown below. Have put numbers for them.
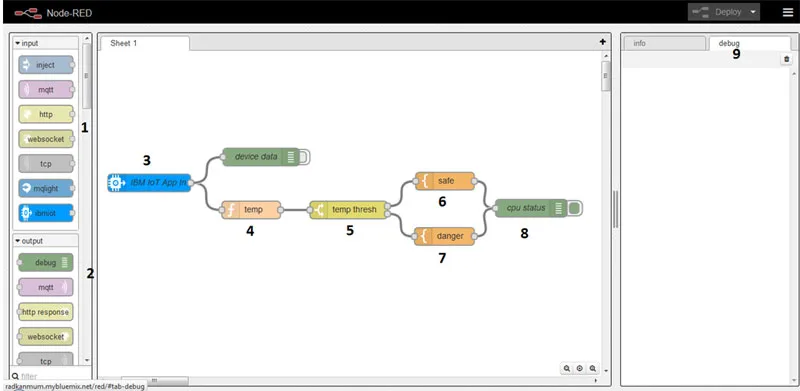
- These are the different input nodes by which the IoT application can pick data from different sensors. In this case, we’re focusing only on the IBM IoT application node for reading sensor data.
- These are the various output nodes the IoT application needs to send data. The data can be sent to devices or to other applications. Remember our examples.
If you scroll down, there are many other features such as functions (for manipulating the data), storage (for storing the data), social (for interfacing with social media). But for the sake of brevity, we’ll restrict our discussion to this point only.
- This is the node which picks data from the sensor.
- This node extracts the temperature field from the data packet coming from temperature sensors.
- This node evaluates the temperature. If the temperature is less than or equal to 40, it’ll go to 6. And if the temperature is more than 40, it’ll go to 7.
- This node takes the temperature reading and appends the words ‘within safe limits.’
- This node takes the temperature reading and appends the word ‘critical.’
- The output coming from Node 6 or 7 goes to the ‘Debug’ node. The Debug just prints whatever data it receives from Node 6 or 7 to the 'Debug Screen’ shown as 9.
- This is the Debug Screen.
You can click on each node to get some more understanding.
Let’s get to our Temperature simulator now.
Click on the link for the temperature sensor simulator, which takes you the screen below.
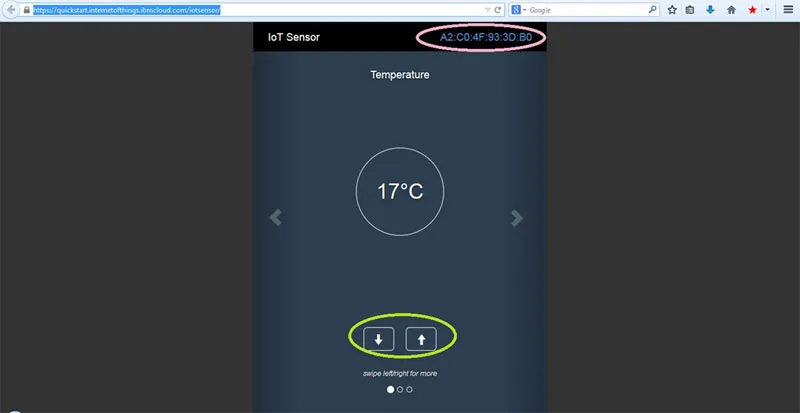
Please note that a unique Device Id (it a MAC address) is generated for you (circled in pink), the IoT node in Bluemix will communicate to this sensor via this Device id.
You can use the 'up’ and 'down’ buttons (circled in green) to increase or decrease the temperature.
Copy the Device id from your browser and paste into Notepad. Change capital letters to small letters and remove colons (‘:’). In my case, the sensor had a Device id A2:C0:4F:93:3D:B0, which would be changed to a2c04f933db0 on the Notepad.
Next, click on node 3, which is the IoT Application Foundation.
In the field for Device Id, paste the field you have copied from notepad (in my case it is a2c04f933db0). Make sure there are no leading or trailing space characters. Below screen shows the same.
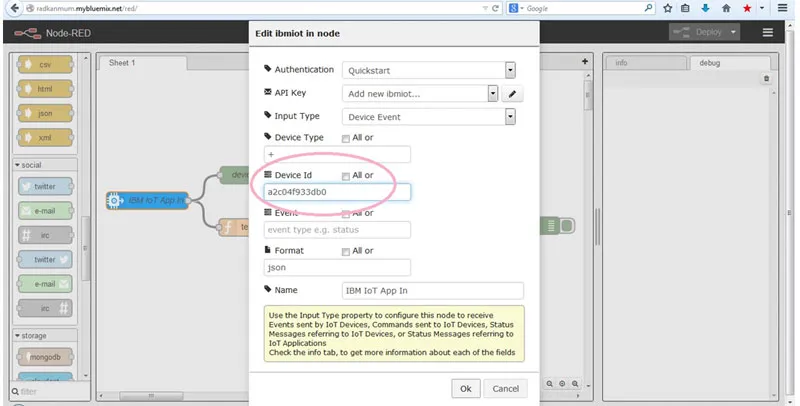
Click on the ‘OK’ button. After that click ‘Deploy’ as shown below.
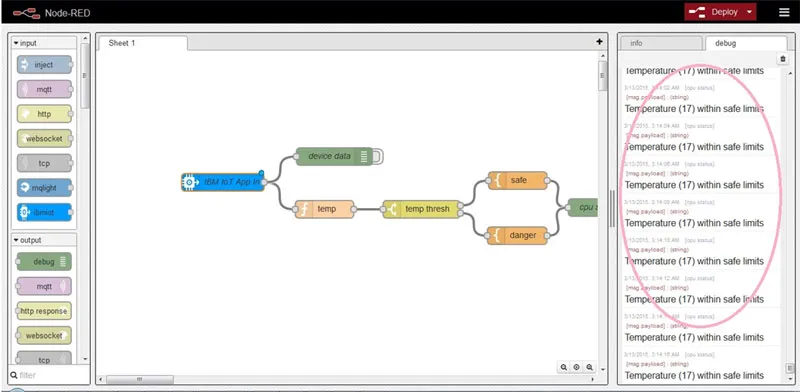
If the temperature is less than or equal to 40, you’ll receive an output of the ‘temperature reading’ appended with ‘within safe limits’ in the ‘Debug Console’ on the right . In my case, the sensor temperature is 17oC. So my Debug Console will show as below.
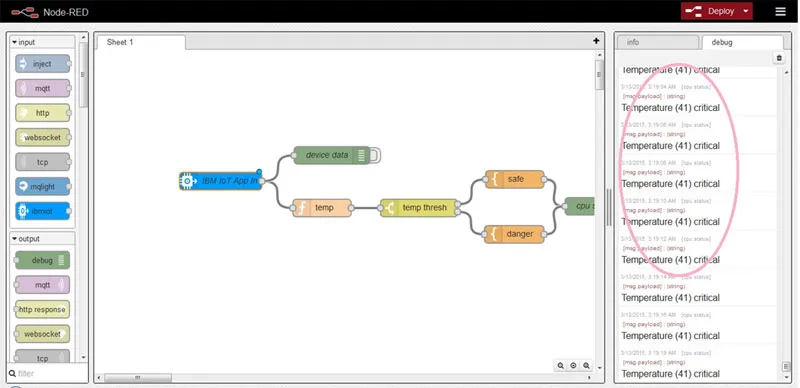
Now, go to your sensor simulator page and increase the temperature to 41oC. It will now pass through Block 7 instead of 6, which means the words that’ll be appended to the reading should be ‘critical.’
So that ends the creation of your first IoT application. Experiment with other nodes like adding a Twitter node and Twilio node to interface with Twitter and your Mobile phones, respectively.
Good luck with you next application on IoT!
![[Weekly funding roundup] Investments into startups decline by 57 pc, closes at $107 million](https://images.yourstory.com/cs/2/f08163002d6c11e9aa979329348d4c3e/Weeklyimage-1577460362436.png)