Migrating a VMware based linux image to IBM SmartCloud Enteprise: An overview
Image Migration Fundamentals
Image migration is a task of moving Virtual Machine (VM) image from one virtualized environment to another. Each virtualized environment has images (virtual disks), which are running on hypervisors. Hypervisors emulate compute hardware, while VMs provide hypervisors with virtual disks. One of the common scenarios for image migration is when a team of developers wants to conduct load testing of a specific business solution in a different environment. The easiest way to do this is by taking a snapshot of the development platform, migrate it to a target environment, which is much powerful in terms of hardware, and conduct the development and testing activities. To do this, you will move your VM image (virtual hard disk) from your existing environment to a new environment.
The ‘new’ destination environment will not always be compatible the VM image you have been running in your existing virtualized environment (unless the destination environment is similar to the original environment, e.g. VMware ESX based environment) because of an invalid format, compliance issue.VM images come in different formats viz. raw, cow, qcow, vmdk, mksysbetc; depending on the hypervisor you use. If your existing environment and the target environment are based on different hypervisor technologies, you need to convert your VM image to make it compliant to the target environment. In addition to VM image conversion, you need to configure your VM image to satisfy all the pre-requisites of the target environment. You may need to re-structure your partition, change file-system type and configure additional parameters (security, compliance etc.).
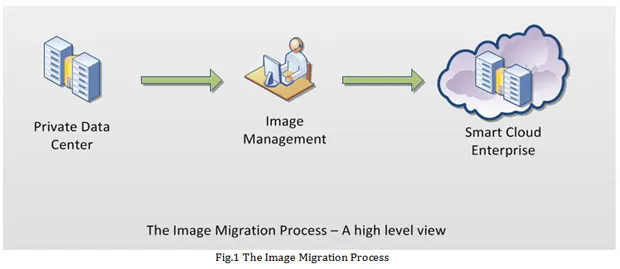
The recent feature of the Smart Cloud Enterprise (SCE) allows users to export their local environment based Virtual Machine (VM) images – virtual disks. Users can export their hypervisor specific (VMware ESX, KVM, Xen etc.) images to SCE. However, the images to be exported need to be in a format and structure that SCE acknowledges. Fig. 1 shows the image migration process at a high level.

Migrating an external image to SCE requires making the image compatible to SCE and then copying the image contents to SCE’s persistent storage. Once done, you can create virtual machine (VM) instances off this image template.
SCE employs Kernel Virtual Machine (KVM) as the hypervisor, off which virtual machine instances are created in the cloud. Hence, it is mandatory to convert any non-KVM based image to a KVM based format before migrating the image to SCE. This article provides details of converting a VMware based ‘vmdk’ (SLES 11, 64 bit) to the SCE recognized format and also migrating the image to run on SCE.
Image Metadata
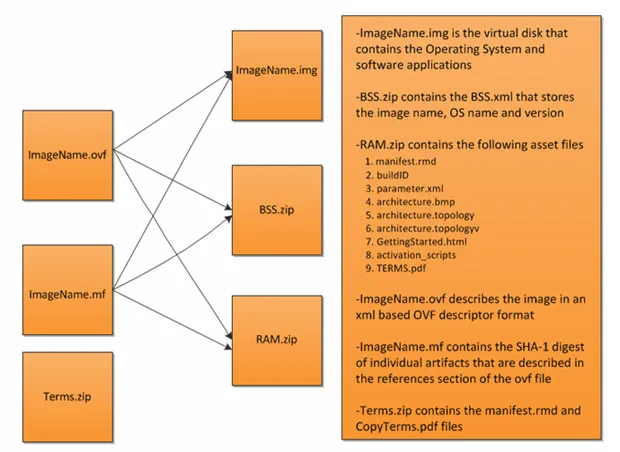
Every image on the IBM SmartCloud Enterprise has metadata associated to it. The following figure describes the metadata associated with an image in the SCE image catalog.

We can reuse the RAM.zip of an existing image from the SCE image catalog and will be replacing the original image.img with our image that you plan to export to SCE. However, there is no need to modify the name of the .img file. We will also recreate a new manifest file (.mf) using the File Validation Tool.
Working on the Image Side
As discussed above, to migrate (export) images to IBM SCE, the images need to be in a SCE compatible format. The SCE ready images can then be exported to SCE with the command line tool and REST APIs.
Here are some of the key requirements for making an image compatible to SCE:
- The image should be in a raw format (.img)
- The virtual disk must have 2 mandatory partitions: /boot and /
- The image should be ‘virtio’ enabled. Virtio is a linux standard for virtualization of network and device drivers
- The images’ virtual disk should be ext3 formatted, not encrypted, not greater than 60 GB in size
- Logical volumes (LVM) are not supported
- Windows volumes are currently not supported
Prior to beginning the process of making the image compatible to SCE, you need to create a VM on the KVM host. This can be done either via command line using ‘qemu’ tools or via the Virtual Machine Manager tool.
Converting the image partition structure to SCE format

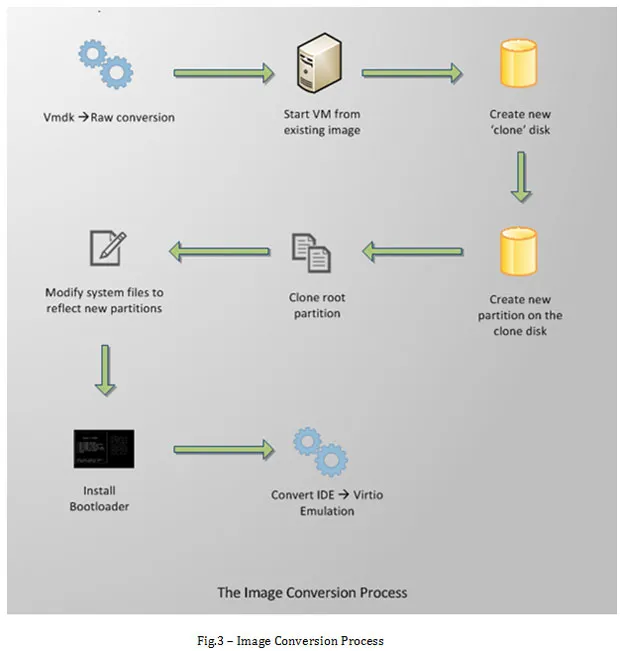
As shown in Fig. 3, the image first needs to be converted to a format that SCE understands. Therefore, the image is converted to a raw format. This can be done using QEMU tools. From an image partition structure point of view, SCE demands an image that has only the ‘/’ and ‘/boot’ partitions. For an image that has Logical Volume Partitions (LVM), the image structure needs to be converted to an SCE required format. The figure also shows the activities of converting an LVM based partition to a static partition and cloning the system & user data, as required by SCE.
Customizing the Operating System and Applying Security Compliance
Another aspect of making the image compatible to SCE is applying security compliance rules to the image to be migrated. We begin by customizing the Operating system (OS) according to SCE standards and then apply SCE specific rules.
- Create an ‘idcuser’ user
- Create .ssh directory, and the authorized_keys file
- Change the ownership and group of .ssh and authorized_keys
- Configuring security settings
- Secure SSH Connections
- Secure firewall
- Disable httpd, vsftpd, and sendmail services
- Disable root login
- Changing default runtime
- Generating keys
Working on the Smart Cloud Enterpriseside
So far, we worked on the image side (lab environment) to make our existing image SCE compatible. The story hitherto is only half-complete. Now we need to work on the side of SCE to complete the migration of the image.

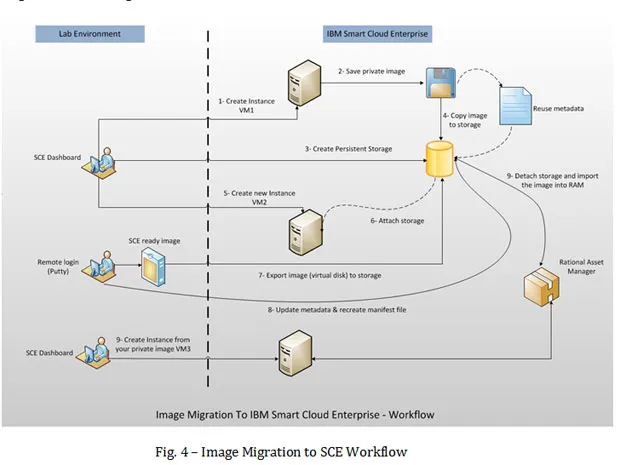
1. Create a VM Instance:
Create a virtual machine instance of the same architecture and OS type on SCE. Choose the data center nearest to your location.
(Becauseyou have to copy the image from your local data center to the SCE data center. The nearest is recommended because the time taken to copy the image will be lesser).
2. Save a Private Image
Once the instance is created, create a private image of this instance.
3. Create Persistent Storage
Create a persistent storage of 60 GB, since the image we want to export is ~40 GB.
4. Copy Image to Storage
Once the request for creating the storage is submitted, we need to copy the saved private image to the storage and later attach the storage to a running VM instance.
5. Create a new VM Instance
After the private image is copied to the storage, we need to create a new VM instance and attach the created storage to it.
6. Attach the storage
While attaching the storage, the mount point should be specified so as to modify the contents of the saved private image.
Reuse the metadata
Once the saved private image is copied to the storage, you can log into the VM to which the storage is attached and confirm the copy. Re-use the metadata of the previously saved private image and delete the private image. Update the BSS.xml and resuse RAM.zip, Terms.zip as they are.
7. Export the image (virtual disk) to storage
Run a copy command (scp) to copy the image to the VM instance created in step 5, at the /data/image location, which is the mount point of the attached storage. It takes around 6-10 hours to copy the image, variable since it depends on the network bandwidth.
8. Update metadata and recreate the manifest file
Copy the FileValidation.sh script on the persistent storage, preferably at the /data location and execute the script.
9. Import Image into RAM
You can go back to the SCE Command Line tool on your local machine and execute the image import command. The import duration depends on the size (GB) of the image to be imported into the Catalog. Once the import is complete, the status of the newly imported image changes to ‘Available’.
10. Create a new instance from your private image
Create a new instance using the graphical interface and log in to see if all your contents are consistent.
I would like to thank my colleagues Tomoyuki Nijima, Narcis Serbanescu and Rambilas Verma who have been a great help in this exercise.

About the author:Aditya Thatte is currently the Head of Strategy & Product Management at BrainChamber Research. He was previously a member of the Cloud Computing research group at IBM Research Lab and IBM's Cloud Center of Excellence. His core areas of interests are Cloud Computing, E-commerce, and corporate strategy. Aditya is an active contributor to cloud computing websites (Cloudbook, IBM Thoughts on Cloud).


