

This is a user generated content for MyStory, a YourStory initiative to enable its community to contribute and have their voices heard. The views and writings here reflect that of the author and not of YourStory.


This is a user generated content for MyStory, a YourStory initiative to enable its community to contribute and have their voices heard. The views and writings here reflect that of the author and not of YourStory.

Losing data accidentally could be a serious problem for you when the data is important, and you can’t get it back. To the flip side, there come situations when you want to erase hard drive data securely so that no one can retrieve it ever.
It could be sensitive files, passwords, bank credentials or anything else stored on your device that you want to shred permanently. Thankfully to help you with this, there comes a built-in utility on your Mac that helps you erase data securely on Mac.
In addition to that, best file shredder tools also help you do that. In this article, we have reviewed both the manual process and using third-party tools to erase your sensitive data permanently.
Why permanently deleting data is important?
Before we discuss how to erase data permanently on Mac, let’s discuss why it is important to erase unnecessary data?
Well, there could be numerous reasons and different files on your Mac that you want to erase permanently. It could be your private files, private photos & videos, passwords & credentials, or anything else.
If you delete this data without permanently deleting it, then it could cause you trouble over time. Here, cybercriminals could recover this deleted data by various means and may cause you trouble. They may use this data for identity theft, load fraud, bank fraud, employment-related fraud, credit card fraud, tax fraud, or anything else.
How to erase data permanently on Mac?
Mac offers a quick solution to help you delete data permanently and securely. Here, you can use built-n Disk Utility to do this. Using this built-in utility, you can wipe complete disk on your disk in few simple steps. It not only helps you recover valuable disk space on your system, but it also helps you make it a more secure place to download files too. To erase files permanently, follow these steps.
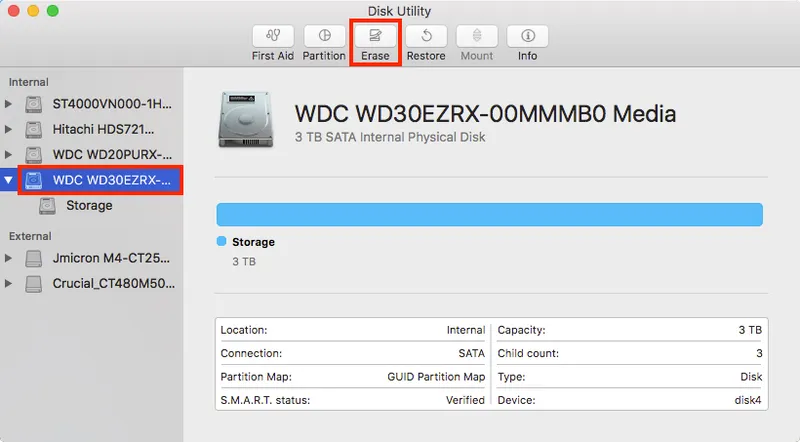
Go to Applications > Utilities to open Disk Utility.
From left pane choose the drive that you wish to erase securely from the list of available drives. (Here, you need to select the drive and not the partition)
Once you have selected the drive to clean, simply click the “Erase” button.
Source: intego
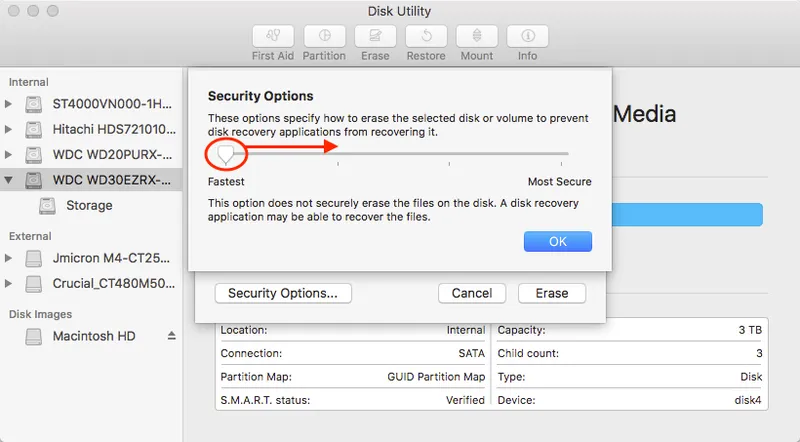
Now you will find a new pop-up window. Here, it will ask you to name the drive once the process to erase is completed. You also need to mention how you want to format it. To do this, click on “Security Options” button.
Here, a new pop-up window will appear. On this window, you will find a slider that could be set on to different stages to decide how thoroughly you want to erase the drive.
Source: intego
Here, you can adjust the slider on different stages including:
Stage 1 (Fastest): At this stage, the data will be erased in fastest way possible. In case you want to recover your data later you can do it using best data recovery tools at this stage.
Stage 2: At stage second, it will write a pass of random data. It will further single pass of zeros over the entire disk. It will completely erase all the information that could be used to access your files and writes over the data 2 times.
Stage 3: This stage is DOE-compliant-3-pass secure erase. Here, it will write two passes of random data first and then single pass of known data over your entire disk. Furthermore, it will erase all the information that could be used to access any of your files and write over the data three times.
Stage 4 (Most Secure): Stage 4 of the process meets the US DOD 5220-22 M standards to help you securely erase data. It shreds all the information that could be sued to access your files and writes over the data 7 times.
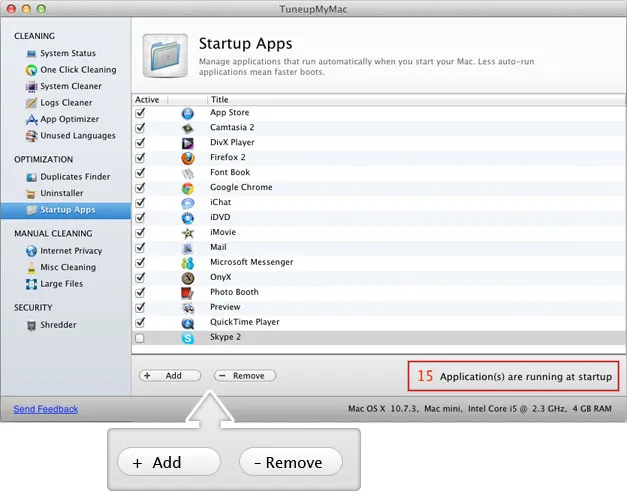
Use TuneupMyMac: Next best solution to safely delete sensitive data is to use one of the best Mac cleaning tools TuneupMyMac. It helps you deep clean your system storage by cleaning all junk files effectively. Working as an effective file shredder tool, it helps you permanently delete all unnecessary sensitive files. Its smart file shredding technology ensures that deleted data remain unrecoverable. In other features, it offers large files cleaning, miscellaneous cleaning, Internet privacy protection, manage startup apps, app uninstaller, and more.
So, this was a quick review of how you can securely erase your sensitive data on Mac. If you have tried something else, then feel free to share in the comments below.